
DIY Pumpkins To Make Your Porch Sparkle This Year
When was the last time you carved a pumpkin? Did it turn out well?
All of my carved pumpkins have looked the same since I started carving pumpkins when I was little. Two triangles for eyes and a smile with large teeth on the top and bottom.
Plus, the carved pumpkins only last a week or two, which is a total bummer.
When I buy pumpkins, they need to last from September, through October. And if I’m lucky, I can keep them until Thanksgiving!
So I turned to my crafting and food background and decided that these creative pumpkin decorating ideas were born out of my brain!
AND they lasted until Thanksgiving!
So pull up a chair, grab a bowl of your favorite fall soup (I love this butternut squash soup!) and dig in! I can’t wait to share these three decorating techniques with you!
The beauty of decorating pumpkins versus carving is their ability to last a little bit longer, so you only have to buy your pumpkins once!
Let’s start with the list of supplies!
Supplies
Pumpkins
Brown Glitter
Gold Glitter
Mod Podge or Hot Glue
Gold Metallic Paint
Gold Glitter Paint
Sequins
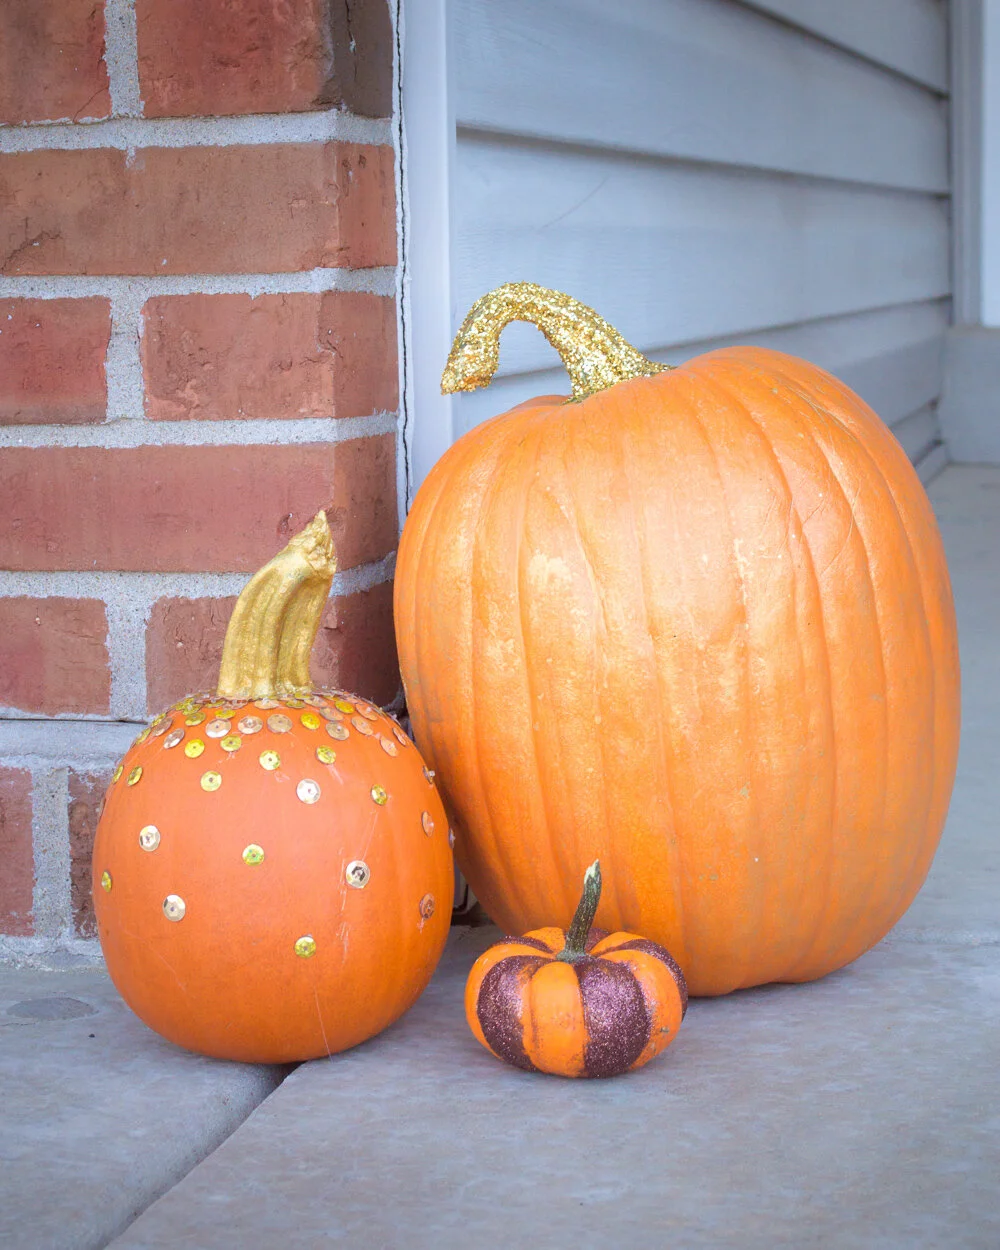
Large Decorated Pumpkin
Paint Brushes
Paper plate
Cup of clean water
Newspaper or plastic sheet to keep floor clean.
Ok. I’ll start with the large pumpkin and work my way down to the baby ones
Large, Gold Pumpkin
To get started, put a little bit of your gold paint on a paper plate and water it down with some of your clean water. Brush this wash all over your pumpkin in layers until you get the desired effect. I like to be able to see the texture and color of the pumpkin underneath the gold, but you might like even less!
I think it makes the pumpkins glow a little!
For the stem, coat it with Mod Podge and then sprinkle the gold glitter all over it.
I would do this outside. Glitter has this quality I like to call “the uninvited house guest.” As in, the one that shows up and never leaves. You don’t want that.
So, unless you are doing this in a box or on a drop cloth, take the glitter outside!
Medium, Sequin Pumpkin
This one was the most time consuming, I'll admit! First, paint the stem with one layer of gold metallic paint and let it dry. You could choose to be finished with the stem at this point OR choose to put 2 coats of gold glitter paint on it. I recommend adding the glitter paint to amp up the glitter factor! Can you tell that I love sparkle?
Now the REALLY sparkly part! I found these fun fall colored sequins and snatched them up with a coupon! You can choose to do whatever pattern you want with these. Like lines or chevron or a solid layer all the way around. I chose to do an ombre effect.
So, using a hot glue gun (or glue product of choice), start by concentrating the bulk of sequins at the top of the pumpkin toward the stem. As you move down the sides, use less and less. There isn’t really an exact technique to use to get this effect, just keep gluing until you like the way it looks!
Unfortunately for these pumpkins, the critters in my neighborhood tried to gobble them up the night after I put them out! I guess they weren't too pretty to eat?
Small, Glitter Pumpkin
These were by far the fastest to decorate! I suspect the small size had to do with it. But I like to think the simple glue and glitter technique had something to do with it.
On this one, just decorate the pumpkins with glue and then sprinkle glitter all over the glue lines. I chose to follow the seams down the side of each pumpkin. It might have gotten a little bit out of hand!
I used a pretty fine brown glitter for this pumpkin, I’m not sure I would choose the brown color again, but I loved how small the glitter was compared to a chunkier glitter! Plus it was really easy to brush off the excess with a spare paintbrush once the glue was completely dry. Total win.
I know that fall is the favorite season of many, many folks. But what's not to love about the seasonal color changes and temperature drops? There is magic in the changing of the seasons and I intend to find joy in each of the changes!